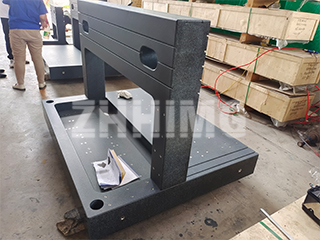
Granite beams are playing an increasingly critical role in the precision operations of modern industry. This component, meticulously crafted from natural stone, boasts exceptional properties and is widely used across a wide range of fields, becoming a crucial element in ensuring production accuracy and product quality.
One of the most notable applications of granite beams is in precision measurement. In high-end measuring instruments such as coordinate measuring machines (CMMs) and profilometers, they serve as essential reference surfaces, laying the foundation for measurement accuracy. Before instrument installation and daily use, operators place the granite beam firmly on the workbench, ensuring its surface is level and free of obstructions. The measuring instrument’s sensor or measuring head then precisely contacts and aligns with the beam’s surface, ensuring instrument accuracy. For example, in a CMM, by aligning the CMM’s probe at a specific location against the granite beam for measurement and alignment, the machine’s zero point and coordinate axis orientation can be precisely determined, laying a solid foundation for subsequent precision measurement. Furthermore, for small, high-precision parts, a granite beam can serve as a direct measurement platform. In the aerospace industry, precision measurement of critical components such as aircraft engine blades relies on this material. By placing the blade on a granite beam, micrometers, calipers, and other measuring tools can accurately measure parameters such as blade size, shape, and positional error, ensuring compliance with stringent design standards.
Granite beams also play a vital role in mechanical test benches. They are a core component of material mechanical testing, such as tensile testing, compression testing, and bending testing. During testing, the sample is securely fixed to the granite beam. Loading devices connected to the beam apply force to the sample, while sensors mounted on the beam accurately measure key parameters such as strain and stress under varying loads. In tensile testing of metal materials, one end of the metal specimen is fixed to the beam, and the other end is connected to the tensile testing machine via a clamp. When the tensile test machine applies tensile force, the inherent stability of the granite beam ensures accurate and reliable test data. In mechanical component testing, gears, bearings, cams, and other components can be mounted on the granite beam to simulate actual operating conditions for comprehensive testing. Taking the inspection of an automobile engine crankshaft as an example, the crankshaft is placed on a beam and rotated by a motor. Sensors measure parameters such as vibration amplitude and rotational speed to assess the crankshaft’s balance and machining quality.
Granite beams also demonstrate unique value in the field of equipment work platforms. In high-precision machine tools such as CNC milling machines and grinders, they serve as worktables, providing stable support for the relative movement between the tool and the workpiece, ensuring the dimensional accuracy and surface quality of the machined parts. When machining molds on CNC milling machines, granite beams provide precise guidance for tool movement, ensuring highly precise dimensions and excellent surface finish. In optical instruments such as laser interferometers and spectrometers, granite beams serve as mounting platforms, supporting components such as optical elements and sensors. Their stability ensures the optical path stability and measurement accuracy of the optical system.
Granite beams also play an important role in the assembly of mechanical equipment. It can be used as an auxiliary positioning tool. Components to be assembled are placed on it, and the positioning and orientation of the components are determined using locating pins, stops, and other devices on the beam. This improves assembly accuracy and efficiency and reduces assembly errors. For example, when assembling a pump body and pump cover, the pump body is placed on the granite beam, and locating pins are inserted into the corresponding holes in the pump body and pump cover to confirm their relative position before tightening the bolts. Furthermore, for components requiring grinding, the granite beam can serve as a grinding reference surface. For example, when grinding high-precision guide rails, the grinding tool and the guide rail to be ground are placed on the beam. Grinding is performed manually or mechanically to remove microscopic surface irregularities, improving wear resistance and motion accuracy.
It is important to note that proper use and maintenance of the granite beam are crucial to maintaining its optimal performance. Regular cleaning is essential to remove dust, oil, and other impurities from the surface, keeping it clean and dry. Avoid scratching with hard objects and prevent contact with corrosive substances such as acids and alkalis. Handle with care during transportation and use, avoiding collisions and drops. Despite its high hardness, granite beams can still be damaged by significant impact, affecting precision and performance. Additionally, they should be stored in an environment with relatively stable temperature and humidity, avoiding direct sunlight, high temperatures, and high humidity. This prevents minor deformation caused by temperature and humidity fluctuations, which could affect precision.
As the manufacturing industry continues to move towards high precision and high performance, granite beams, due to their unique properties, will have an increasingly broad application prospect in the industrial field, providing a solid foundation for precision production and testing in various industries.
Post time: Sep-22-2025

