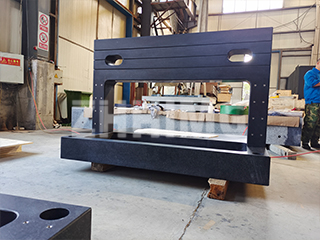
A granite surface plate, also known as a granite inspection platform, is a high-precision reference base widely used in industrial production, laboratories, and metrology centers. Made from premium natural granite, it offers superior accuracy, dimensional stability, and corrosion resistance, making it ideal for a wide range of measuring and calibration applications.
Material Composition and Physical Properties
Granite used for precision platforms typically contains:
-
Pyroxene
-
Plagioclase
-
Minor amounts of olivine
-
Biotite mica
-
Trace magnetite
These mineral components give the granite a dark color, dense structure, and uniform texture. After natural aging, the stone achieves:
-
High compressive strength
-
Excellent hardness
-
Superior stability under heavy loads
This ensures that the surface plate maintains flatness and accuracy, even in demanding industrial environments.
Modern Usage Trends: Flatness Over Contact Points
In the past, users often emphasized the number of contact points when evaluating granite surface plates. However, with the growing size and complexity of workpieces, the industry has shifted toward prioritizing surface flatness instead.
Today, manufacturers and users focus on ensuring the overall flatness tolerance rather than maximizing contact spots. This approach offers:
-
Cost-effective production
-
Sufficient precision for most industrial applications
-
Adaptability for larger workpieces and equipment
Why Choose Granite for Measurement Applications?
1. Dimensional Stability
Granite undergoes millions of years of natural aging, eliminating internal stress. The result is a stable, non-deforming material ideal for long-term use in precision environments.
2. Chemical and Magnetic Resistance
Granite is resistant to acids, alkalis, corrosion, and magnetic interference, making it suitable for chemical storage areas, cleanrooms, and high-tech manufacturing.
3. Low Thermal Expansion
With a thermal expansion coefficient between 4.7 × 10⁻⁶ to 9.0 × 10⁻⁶ inch/inch, granite surfaces are minimally affected by temperature changes, ensuring accurate readings in variable conditions.
4. Moisture-Proof and Rust-Free
Unlike metal alternatives, granite is impervious to humidity and will never rust, ensuring low maintenance and a long service life.
5. Superior Hardness and Wear Resistance
As one of the hardest construction materials, granite offers exceptional abrasion resistance, even under frequent use.
6. Smooth Surface Finish
The surface can be finely ground and polished, providing a low-roughness, mirror-like finish that ensures good contact with measured parts.
7. Impact Tolerance
If the surface is scratched or struck, granite tends to develop minor pits rather than burrs or raised edges—avoiding distortion in critical measurements.
Additional Advantages of Granite Inspection Plates
-
Non-magnetic and anti-static
-
Easy to clean and maintain
-
Environmentally friendly and naturally formed
-
Available in various grades and sizes
Conclusion
The granite surface plate continues to be a foundational tool in modern precision industries. With its dimensional accuracy, long-term stability, and resistance to environmental factors, it supports applications ranging from CNC machining to quality control in electronics, aerospace, and instrumentation.
As workpiece dimensions and inspection complexity grow, granite surface plates remain a reliable and cost-effective solution for maintaining the highest measurement standards.
Post time: Aug-01-2025

